

Knowing how to update GPU drivers involves identifying the right software package and employing the correct installation steps. While it’s generally the same method, most dedicated GPUs have different processes.
This guide will drill into the specifics of how to update NVIDIA graphics drivers. You can follow our article on how to update Windows device drivers if you’re looking to update other drivers.
When Should You Update Your NVIDIA Graphics Drivers?
You should ideally update your NVIDIA drivers whenever they are available. You wouldn’t want to miss out on hotfixes for certain GPU problems, new features, and improved general performance.
However, it’s difficult to remember to check for updates, especially if GeForce Experience isn’t installed. The program is crucial because it alerts you whenever NVIDIA releases new GPU drivers.
So, always remember to update your drivers after doing the following:
- Reinstalling and upgrading Windows
- Restoring Windows to a previous date
- Installing new GPU hardware
You should also check for driver updates whenever you notice performance drops and disruptive glitches.
How to Check if Your Driver Is Up to Date
The best way to confirm whether you have the latest NVIDIA drivers is by attempting to update your current driver. You can always run any of the programs we’ll be discussing below to confirm.
However, going through your GPU manufacturer’s website and checking your current driver version is another option. You can check your graphics card’s current version by going through Device Manager. Here’s how:
- Open the Start menu, search for Device Manager, and open the program.
- Go to the Display adapters section and right-click your NVIDIA graphics card.
- Select Properties and go to the Drivers tab.
- You should see your driver version and date of release under the driver tab.
You can go to NVIDIA’s website, select your GPU and Windows version, and search to check the latest driver release.
You’ll find out more as you continue reading.
How to Update NVIDIA Drivers in Windows 10/11
The process for installing driver updates on both operating systems is similar. You only have to specify your Windows version when downloading the driver from NVIDIA’s website.
Now, let’s cover the different ways you can update your driver.
Downloading the driver manually and using Device Manager
This method involves going to NVIDIA’s website to select the best driver for your device. You have to use this option if you have not yet installed GeForce Experience, NVIDIA’s dedicated GPU software program.
Device Manager will also be unable to update your driver if you have not downloaded the software package.
These steps will show you how to download NVIDIA drivers, using my RTX 2060 notebook graphics card as an example:
- Head to the NVIDIA Driver Downloads webpage and click Driver at the top of the page.
- Next, select your GPU type, GPU series, specific NVIDIA GPU model, operating system, download type (Game Ready or Studio driver), Windows version and architecture, and language.
- Click the Search button after selecting your GPU and operating system details.

- The latest driver for your device will now appear.
- Click the Download button.
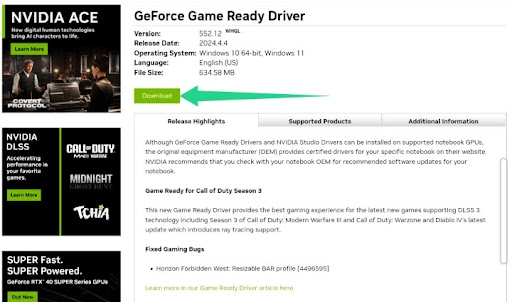
- Once the download completes, click it from your browser to run and install it.
Going through Device Manager
You can also open the Device Manager window to find and install the driver you just downloaded. Follow these steps:
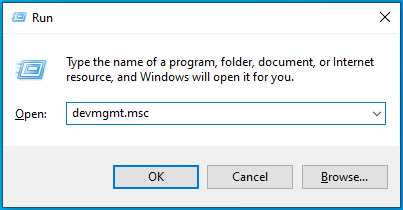
- Press the Win + R combo to open Run.
- Type devmgmt.msc and press Enter on your keyboard.
- Expand the Display adapters category immediately after the Device Manager window shows up.
- Right-click your NVIDIA GPU and select Update driver.
- Now, choose “Search automatically for drivers” to allow Windows to search your computer for the driver you downloaded and install it.
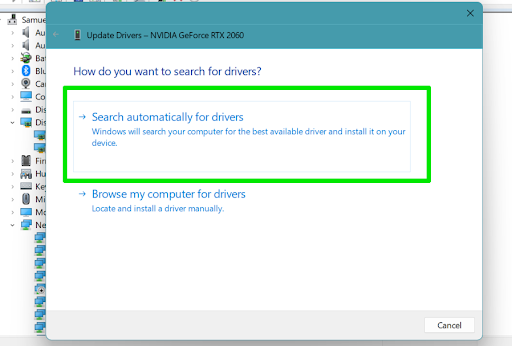
The “Browse my computer for drivers option” allows you to pick the specific folder to search.
- Once Windows finds and installs the driver, restart your system for the changes to take effect.
How to use GeForce Experience
GeForce Experience serves as your NVIDIA GPU’s auxiliary software. Its primary functions include keeping your drivers updated, tuning your game configurations for peak performance, and optimizing the video card for video rendering and other graphics-related tasks.
The program automatically detects your GPU’s available updates, so you don’t have to search the Internet manually. If you do not have GeForce Experience, you must go through NVIDIA’s website to download and install a driver for your computer.
Follow these steps if you have GeForce Experience:
- Launch GeForce Experience and click Drivers at the top of the window.
- Select Download if the program shows an available update.
- Choose between the following:
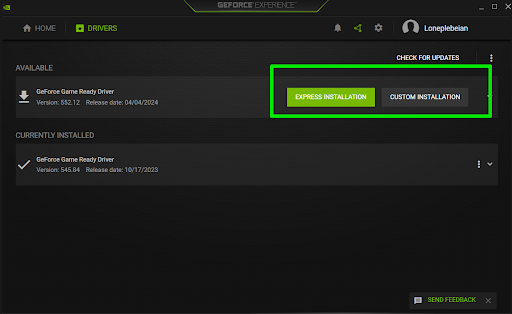
- Express Installation: Allows GeForce Experience to install the driver with the recommended settings. Choose this option if you want to install the driver as is or do not know how to use the custom install method.
- Custom Installation: Allows you to pick which components and features within the driver package to install. This option comes in handy if you’re sure that specific features, such as the audio driver, may cause conflicts. Still, you should only use the custom method if you know what you are doing.
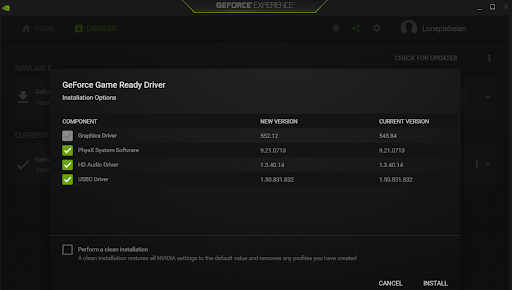
- Allow the program to complete the installation.
- You should now see a summary of the installation once it’s complete.
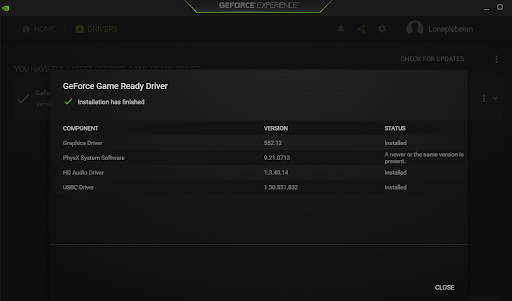
- Restart Windows.
Also read: The Ultimate Fix for NVIDIA GeForce Experience Error 0x0003
Enable automatic driver downloads
While GeForce Experience will always notify you when driver updates are available, it will not download them by default. But the program can automatically download the drivers after release and you can install them whenever you choose.
I like to keep the automatic download option turned on so I get to install the driver whenever I get the notification, instead of starting the download process and waiting for it to complete.
Follow these steps:
- Launch GeForce Experience.
- Click the Settings icon in the top-right corner.

- Next, scroll to the Downloads section at the bottom of the page and check the box for “Automatically download driver updates and let me choose when to install.”
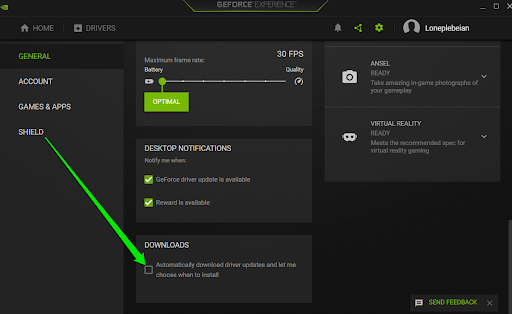
- Restart the application.
Use Auslogics Driver Updater
Auslogics Driver Updater is a third-party application designed to update any Windows device driver, not just your GPU driver. The tool automatically detects and fetches official updates for outdated and corrupted drivers. It can also run scheduled updates and alert you whenever new drivers are released.
I enjoy the backup and restore features the most since they allow me to roll back from problematic updates to previously working drivers.
Here’s how to use it:
- Download and install Auslogics Driver Updater.
- Click the Start scan button to start scanning your computer for outdated and problematic drivers.
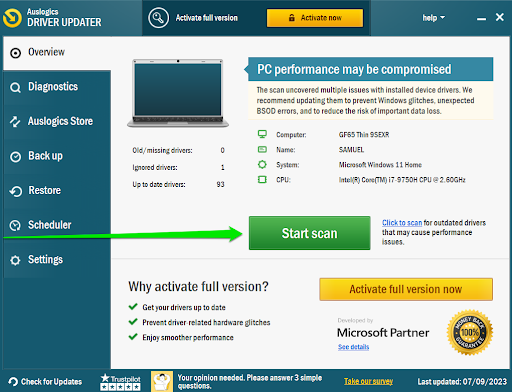
- The tool will now begin the scan to search for available updates.
- You should now see a list of devices whose driver updates are available.
- Click the Update drivers button to start updating them.
You can also use the scheduler to set the frequency for update checks. The Back up and Restore tabs allow you to back up working drivers so that you can restore them in the future.
Use OEM software
Most OEMs provide different specialized device drivers for their systems. These updates are often delivered through dedicated programs, such as MSI’s Driver & App Center and Dell’s Update Application, and driver download webpages.
The following screenshot shows the latest available NVIDIA driver for my laptop as at the time of writing.

Visiting an OEM’s website involves entering the computer’s serial number or make and model to find drivers. However, dedicated applications automatically detect PC specifications and help download drivers.
That said, these methods do not guarantee the latest graphics drivers, as PC manufacturers do not always keep up with NVIDIA’s update frequency.
Extra Tip: Keep Windows and Other Drivers Updated
Knowing how to install NVIDIA drivers is often not enough. You need to keep Windows and other device drivers updated since they work alongside your graphics drivers to deliver a great gaming and overall software experience.
Updating Windows also introduces new operating system features and fixes glitches that may be affecting graphics performance.
While the Windows Update client is set to automatically check for and install updates, you may have to run the program yourself once in a while. It’s easy. Just type updates in the Start menu and click “Check for updates” to start the process.
You can use Auslogics Driver Updater to keep other drivers, such as your audio driver, up to date.
How to Update NVIDIA Drivers: Explained
That’s how to update your NVIDIA graphics drivers. Always remember to check for new drivers when you notice issues with FPS and performance. You should also keep Windows and other drivers updated, as they can also cause performance bumps.
Let us know if the methods above helped you to successfully update your NVIDIA drivers.